I thought I would participate in Making Monday Marvelous day on the C.R.A.F.T. blog, as well as Metamorphosis Monday at http://www.betweennapsontheporch.blogspot.com/. Given the Valentines theme, I thought I would share with you one of my great loves ~ Kewpie dolls! Last spring I created a Kewpie themed display shelf that I hung on the wall in my guest/craft room.
I'll share the process with you, in case you might want to create something similar to showcase a collection of your own.
STEP ONE:
First, I took a sturdy gift box, that was divided into sections. The kind of box that originally held a set of four vases. I don't have a before picture of the exact box that I used, but here are a couple pics off google that show the same kind of box:
If you don't already have a box like this, I would suggest you keep your eyes out for a similar box at garage sales or flea markets. You could even request a box like this on freecycle. I found mine, already empty, at a thrift store.
STEP TWO:
Decorate the box. I first used spray paint, but you could also cover the box in gift wrap, fabric, vintage papers such as maps or dictionary pages, or scrap book paper. I wanted my box to be pretty simple - so that the dolls themselves would be the main feature. I used a baby pink spraypaint to coat the box inside and out.
STEP THREE:
I also decided to add a couple of wooden finials to the bottom of the box. I picked up the finials at Lowes, but you could probably get them at any hardware store. They were unpainted pine, and only cost a couple of dollars each. The type of finial I used is shown in the picture below. Ignore the glue. I didn't use glue to attach the finials, I used screws and nuts.
STEP THREE:
Before attaching the finials, I painted them red, so that they would create a nice contrast with the pink box. Then, I attached them to the bottom of the box, again, using screws. Here are a couple pictures of the finials attached to the box:
STEP FOUR:
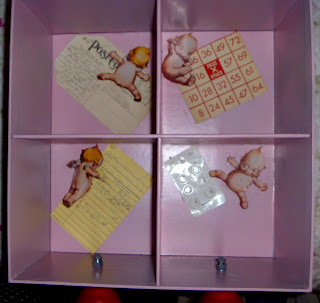
Next, I decoupaged the inside of the box with vintage ephemera. I used a vintage bingo card, a vintage receipt, a vintage card of buttons, and a vintage postcard. I also added some vintage Kewpie images, inside the box. Here is a shot of one of the four compartments in the box:
Here is a picture of the box when I was finished decoupaging all four of the inside compartments:
(Don't worry about the screws showing on the inside, they'll be hidden in the next step.)
STEP FIVE:
I used a hot glue gun, and attached four of my favorite vintage Kewpie dolls inside, one doll to each compartment. Finally, I attached a fifth doll to the top of the box, to balance out the finials on the bottom. I also attached a vintage dress bow to the front, hot gluing it to center of the box where the four corners met.
And then my box was ready to be hung on the wall! (I attached a wire hanger to the back, but you could use whatever method of handing the box that works for you.)
Voila!
I love my little handmade Kewpie Curio. I spent less than $10 total on the paint, finials, and box, and it took less than one afternoon to complete. You could use the same method to create your own themed curio, as it lends itself to pretty much any "mini" item collection.
A couple of last tips: Be sure that your box is sturdy, and test it by putting your items in it and holding it upright before you begin, to be sure that the weight of the items you place in it don't cause the cardboard to bow. Also, you don't want your box to be too deep, as it will cast shadows on the decoupage inside, which you want people to see, because it is a part of the fun. If you decide to use a darker theme, I suggest you still paint the inside compartments a lighter color, again, to invite natural light inside your wonderful new curio.
Happy Monday everyone, and have a lovely Valentines Day!


.JPG)


No comments:
Post a Comment